
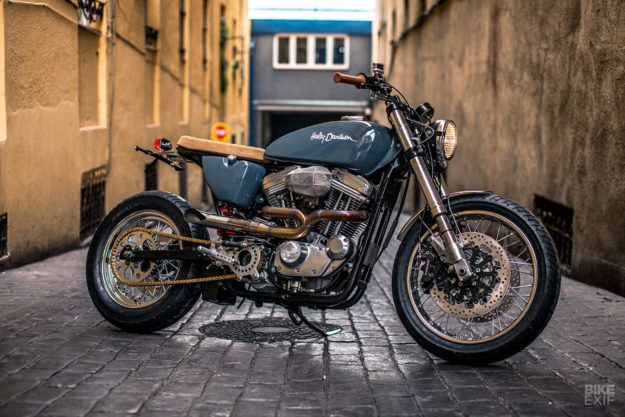
Alright, let’s dive into this Harley cafe bike project I’ve been tinkering with. It’s been a wild ride, and I’m stoked to share the nitty-gritty details.

First things first: The Tear Down
So, I picked up this old Harley – a real beater, to be honest. It was rough around the edges, but I saw potential. The first step? Strip it down. I’m talking EVERYTHING off. Tank, fenders, seat, the whole shebang. I spent a weekend just disconnecting wires, unbolting parts, and labeling everything like a mad scientist. Took tons of pics too, because let me tell you, future-me would be cursing past-me if I didn’t.
Frame Mods – Choppin’ and Weldin’
The stock frame wasn’t quite right for the cafe racer look I was going for. Time to get the grinder and welder out. I chopped off the rear frame loop and fabricated a new one with a more aggressive, upswept angle. This was tricky! Ensuring everything was straight and aligned took some serious measuring and double-checking. Lots of sparks, a few burns, and a whole lotta grinding later, I had a frame I was happy with. Then came the gussets for added strength. I don’t want this thing folding on me when I’m rippin’ down the road, you know?
Engine Rebuild – Gettin’ Dirty
This engine was ancient. Carb was gunked, gaskets were leaking, and it was generally unhappy. I pulled it completely apart, cleaned every single piece, and replaced all the worn-out parts. New pistons, rings, bearings, seals – the works. Honed the cylinders, lapped the valves, and spent hours getting it all back together. Let me tell you, working on an old engine is like archaeology. You find all sorts of weird surprises hidden inside. But finally, after a lot of elbow grease, the engine was looking (and hopefully running) like new.
Bodywork – Sheet Metal Magic
Cafe racers are all about that minimalist look, right? So, I fabbed up a custom seat pan from sheet metal. Shaped it, hammered it, and welded in some supports. Then, I got to work on the tank. I wanted something sleek and low-profile, so I modified an old aftermarket tank I found at a swap meet. More cutting, welding, and grinding (are you seeing a pattern here?). The rear cowl was another fun project. I shaped it from fiberglass, molded it to fit the seat, and spent way too much time sanding it smooth.
Paint – Layin’ Down Color
After all that metalwork, it was time for paint. I went with a classic British racing green with some subtle gold pinstriping. Prep work is key here. Sanding, priming, more sanding… then finally the color coats. Followed by clear coat, of course. I used a spray gun in my garage, so it’s not a professional job by any means, but I’m pretty happy with how it turned out. The pinstriping was a real pain, though. Steady hand and lots of patience required!
Wiring – The Great Spaghetti Monster
Oh man, the wiring. This was the part I dreaded the most. Old wiring harnesses are a nightmare of brittle wires, cracked insulation, and questionable connections. I ripped the whole thing out and started from scratch. A new simplified harness, modern fuse box, and LED lighting all around. Crimping connectors, soldering wires, and routing everything neatly took forever. But finally, it all worked! Headlights, taillights, turn signals – everything lit up like a Christmas tree.
Final Assembly – Puttin’ It All Together
With all the individual components sorted, it was time for final assembly. Bolting the engine back into the frame, mounting the tank and seat, hooking up the controls, and adjusting everything just right. This is where you really start to see your vision come to life. It’s a satisfying feeling, seeing all those individual parts transform into a complete motorcycle.
The Ride – Time to Rumble
Finally, the moment of truth. Fresh fluids, a new battery, and a few prayers later, I hit the starter button. It coughed, sputtered, and then ROARED to life! That first ride was amazing. A little rough around the edges, sure, but it was MY cafe racer. The sound, the feel, the look – everything was just right. This project took months of weekends, late nights, and a whole lot of effort, but it was totally worth it.
Lessons Learned – Wrenchin’ Wisdom
Building a cafe racer from scratch is not for the faint of heart. It’s challenging, frustrating, and expensive. But it’s also incredibly rewarding. I learned a ton about motorcycles, fabrication, and problem-solving. And I ended up with a one-of-a-kind machine that I’m proud to call my own. So, if you’re thinking about tackling a project like this, go for it! Just be prepared to get your hands dirty, learn a lot, and have some fun along the way.
- Don’t be afraid to ask for help. There are tons of online forums and communities where you can find advice and support.
- Take lots of pictures. You’ll thank yourself later when you’re trying to remember how something goes back together.
- Invest in good tools. They’ll make the job easier and more enjoyable.
- Be patient. Things will go wrong. Just take a deep breath, figure it out, and keep going.
- Have fun! It’s a hobby, not a job. Enjoy the process.
That’s the story of my Harley cafe bike. Hope you found it interesting!