
Okay, so I’ve been itching to get my hands dirty with a new project, and I finally settled on something pretty ambitious: turning a Suzuki Savage into a chopper. I’ve always loved the look of those low-slung, stretched-out bikes, and the Savage seemed like a good, affordable base to start with. It’s a single-cylinder thumper, not a ton of power, but that’s not really the point of a chopper, right? It’s all about the style.
The Tear Down
First things first, I gotta strip this thing down. I started by yanking off the seat, the tank, the fenders – basically anything that wasn’t essential to the frame and engine. I labeled everything and took tons of pictures, which, trust me, is a lifesaver later on when you’re trying to figure out where that random bolt goes. The wiring harness was a bit of a rat’s nest, but I carefully unplugged everything, trying to keep it as intact as possible. Might reuse some of it, might not, we’ll see.
Chopping and Welding
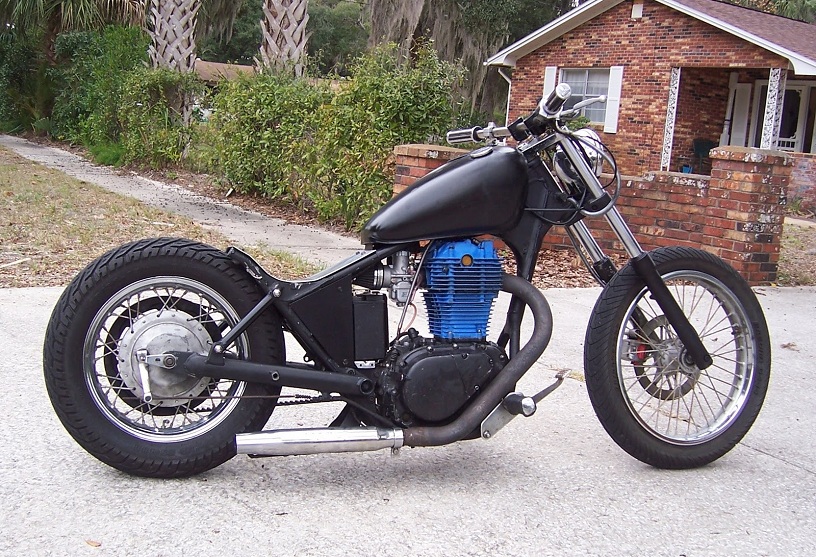
Now for the fun part – actually making it a chopper! This involved some serious cutting and welding. I decided to go with a hardtail conversion, meaning I’m ditching the rear suspension for a rigid frame. This gives it that classic chopper look, but it definitely makes for a rougher ride. I bought a pre-fabbed hardtail kit specifically for the Savage, which saved me a lot of fabrication time. I chopped off the rear section of the frame, lined up the hardtail, and started welding. My welding skills are… okay, let’s just say I’m glad I practiced on some scrap metal first. It ain’t pretty, but it’s strong.
- Cut the frame: This was nerve-wracking, but I measured twice (or maybe five times) and cut once.
- Weld the hardtail: Took my time, made sure everything was square and level, and laid down some (hopefully) solid beads.
- Grind and smooth: Lots of grinding to clean up the welds and make everything look halfway decent.
Mock-Up and Parts
With the frame sorted, I started mocking up the rest of the bike. I got a longer front fork, a skinny front wheel, and a low-profile seat. It’s really starting to look the part now! I played around with different handlebars, trying to find something that looked right and felt comfortable. I’m also thinking about a custom exhaust – something loud and obnoxious, naturally. I ordered bunch of other small parts online like, custom mirrors, tail light and signals.
The Frustrations
It hasn’t all been smooth sailing, though. There have been plenty of moments where I wanted to throw my tools across the garage. Parts didn’t fit right, I ran out of welding gas in the middle of a crucial weld, and I definitely underestimated how much time this whole thing would take. There were a few times I lost nuts or bolts, and spent far too long looking for them.
The Current State
Right now, the bike is still in pieces, but it’s getting closer. The frame is mostly done, the front end is on, and I’ve got a pile of parts waiting to be installed. Next up is figuring out the wiring, getting the engine running smoothly, and then tackling the paint job. I’m thinking a classic black with some subtle pinstriping. We’ll see. I also need to get the seat fitted.
It’s a long, slow process, but I’m learning a ton along the way. And honestly, even with the frustrations, it’s been a blast. I can’t wait to finally get this thing on the road and feel that wind in my face (and the vibrations through my spine, thanks to the hardtail!). I’ll keep updating as I make more progress.