
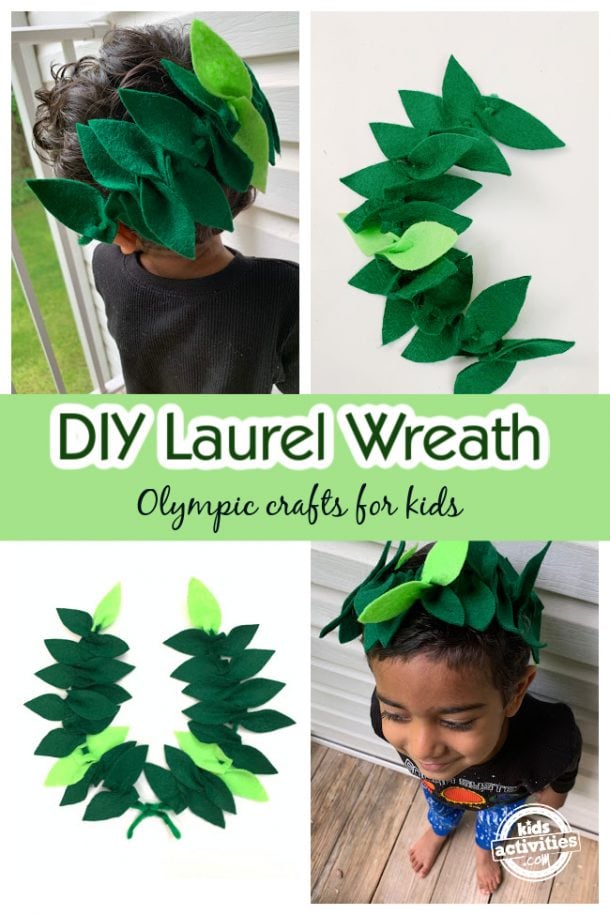
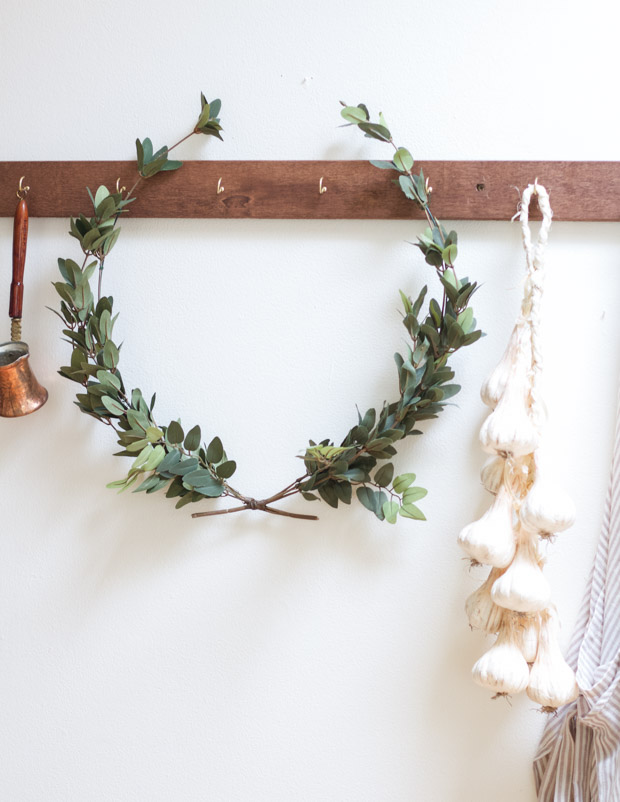
So I saw some nice laurel branches near the park and thought, “Hey, why not try making one of those leafy crown things like in the old pictures?” Seemed straightforward. Spoiler: it wasn’t at first. Took me a few tries. Here’s exactly what went down.
Grabbing the Stuff I Needed
First, I had to get materials. Didn’t want anything fancy.
- Laurel Branches: Found a laurel shrub. Snapped off a bunch of flexible green stems, about the thickness of a pencil. Needed more than I thought – maybe 8 or 10 decent lengths?
- Scissors/Pruners: Used my garden clippers to clean up the ends. Kitchen scissors might fight you harder.
- Floral Wire: Dug some thin green wire out of the junk drawer. That bendy metal stuff florists use? Perfect.
- Green Floral Tape: Had some lying around from an old project. Not essential, but helps hide the wire later.
The “How Hard Can It Be?” First Try (Fail)
Grabbed one stem. Tried bending it into a circle right away. Snap! Too stiff. Felt stupid. Grabbed two thinner stems. Tried twisting them around each other like a rope. Got tangled. Ends stuck out everywhere like antlers. Looked like a sad spaghetti circle, not a crown. Scratched my ear trying it on.
Figuring Out the Weaving Thing
Okay, needed a smarter plan.
- Cut a Base Wire: Measured the wire around my head, added maybe 4 extra inches, and snipped it. Made a circle just a tiny bit bigger than my head.
- Starting Point: Took one laurel stem. Held one end against the wire circle. Wrapped the green floral tape tightly around that spot a bunch of times to lock it down. Taped about an inch of the stem tip onto the wire.
- Weaving Time: Took a second stem. Laid it along the wire base so it overlapped the taped part of the first stem. Wrapped tape around both stems AND the wire where they overlapped. Kept adding stems like this, one by one. Overlapped each new stem over the thick taped part of the previous one, taping it down securely each time. Made sure all the leaves faced the same way – outwards!
- Going All the Way Around: Just kept stacking and taping stems around the wire circle. Had to press down the leaves to see where to attach the next stem. Used shorter pieces as the circle filled in. Aimed for good coverage, hiding the wire base underneath.
- Closing the Deal: When I got back near the start, I tucked the last stem’s end under the very first taped section. Added extra tape to secure it real tight. Then I flipped the whole thing over.
Making it Look Less Janky
Flipped it over. Ugly wire bits and tape ends were visible underneath. Used shorter leaf pieces and tucked them over any gaps, taping them onto the base. Wrapped little bits of the green tape over any shiny wire still showing, kind of smushing it on with my thumb to make it stick. Bent some of the longer leaves outward to make it look fuller.
Boom. Crown.
Finally slid it onto my head. Not Roman emperor perfect, but definitely leafy crown vibes! Felt surprisingly sturdy. Success smell? Like a garden. A few leaves got bent or tore during the struggle, but honestly, it looks kinda wild and natural. Much better than my first floppy pancake attempt.
Quick Tips I Learned the Hard Way:
- Use stems fresh off the bush. Drier ones crack.
- Wrap tape TIGHT each time. Things wiggle loose otherwise.
- If the wire base pokes through leaves, just slap more tape on it.
- Mist it with water if it starts looking droopy later.
- Fridge it for later? Maybe. Just hanging it up works.
Was it perfectly easy? Nope. Took trial and error. But seeing that finished circle? Yeah, felt pretty good. Go grab some leaves!