
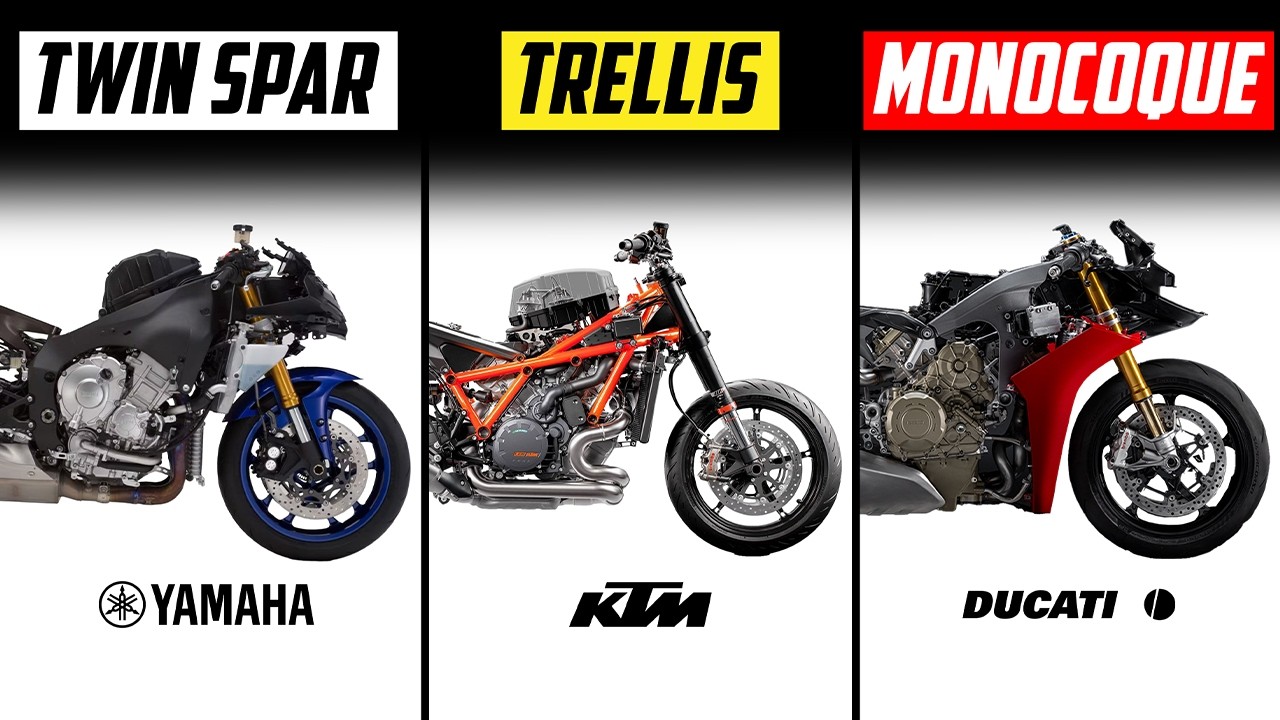
Okay, so I decided to finally have a crack at building my own twin spar frame. Been thinking about it for ages, you know? Always liked the look of them, proper solid looking things on bikes.

Getting Started – The Why and How
It wasn’t like I woke up one day and just knew how to do it. Nah, it started with seeing a couple of custom builds online and thinking, “I reckon I could give that a go.” My old project bike needed something special, and a factory frame just wasn’t cutting it for what I had in mind. Plus, I like messing about in the garage, gives me something to do.
First thing was sketching. Lots of sketching. Just paper and pencil, nothing fancy. Trying to figure out the basic shape, where the engine would sit, the steering head angle, swingarm pivot point. You gotta get this bit kinda right, otherwise, the whole thing will handle like a shopping cart. I borrowed some ideas from frames I liked, measured some stuff on existing bikes I had access to.
Gathering the Bits and Pieces
Then came the hunt for materials. Decided on aluminum for this one. Lighter, looks cool, but a bit trickier to weld, or so they say. Found a local supplier for the big box section tubes for the main spars and some other bits for the headstock and mounts. Getting the right grade of aluminum was important, didn’t want something too soft.
Tools-wise, I already had a decent TIG welder, which was a plus. Had to get myself a proper tube notcher though, trying to get those fish-mouth cuts right with just an angle grinder is a nightmare, trust me, I’ve tried before on other stuff. Lots of files, measuring tape, clamps, a big flat workbench – the usual suspects.
Building the Jig and Cutting Tubes
Before cutting any expensive aluminum, I built a jig. Super important. Just knocked something together from scrap steel box section I had lying around. Basically, a flat base with uprights to hold the headstock tube and mounts for the swingarm pivot area. Needed to make sure everything would line up perfectly straight when I started welding.
Cutting the main spars was nerve-wracking. Measure ten times, cut once! Used the tube notcher to get the angles spot on where they meet the headstock and the swingarm area. Took my time with this, slow and steady. Lots of trial fitting, filing a bit here and there until the joints were snug.
Welding It All Together
Okay, welding time. Cleaned all the joints meticulously. Aluminum needs to be super clean before you weld it. Started by just tacking everything together in the jig. Tack, check alignment, tack some more, check again. You really gotta watch out for warping as the metal heats up.
- Tacked the headstock to the main spars.
- Tacked the spars to the swingarm pivot plates.
- Added some cross braces for rigidity.
- Checked everything about a million times with a straight edge and spirit level.
Once I was happy it was all square and true (or as close as I could get it!), I started laying down the proper welds. TIG welding aluminum takes a bit of practice, getting the heat right, feeding the filler rod smoothly. My welds aren’t pro-level pretty, but they’re strong, and that’s what matters. Went section by section, letting things cool down a bit in between to try and minimize distortion.
Adding the Fiddly Bits
With the main structure done, it was time for all the brackets. Engine mounts were tricky, had to make sure the engine would sit exactly where I planned. Made up some plates, clamped them in position, tacked, checked, then welded fully. Same process for the rear shock mount, footpeg hangers, fuel tank mounts. Lots of little bits that take way longer than you think.
The Result (So Far)
And well, there it is. A twin spar frame, sitting on my workbench. It’s not painted or anything yet, still raw aluminum. Needs a good clean-up, some welds could be prettier, but it’s straight, it feels incredibly stiff, and all the mounting points line up with the engine and swingarm I mocked up.
It was a lot of work, more than I probably anticipated. Lots of head-scratching moments, a few choice words when things didn’t line up perfectly first time. But seeing it actually come together from a pile of tubes is pretty cool. Learned heaps along the way, mostly about patience and double-checking everything. Now, the next step is figuring out the finish and starting to actually build the rest of the bike around it. That’s a whole other story though!